
Click or scroll to zoom
Tap or pinch to zoom

Click or scroll to zoom
Tap or pinch to zoom

Click or scroll to zoom
Tap or pinch to zoom

Click or scroll to zoom
Tap or pinch to zoom

Click or scroll to zoom
Tap or pinch to zoom

Click or scroll to zoom
Tap or pinch to zoom


Jazzy Jay DIY
DIY
$0.00
SKU DIY129
This sparkly, striped blue jay is looking sharp! We love the dramatic and fun feathered face of this bird. The included template makes this DIY paper bird a project kids of all ages will enjoy.
Supplies
- Looking Sharp Blue Sparkle Plus Bolder Borders® T85429
- Googly eyes, a craft feather, and a chenille stem
- Double-stick tape, glue, scissors, a ruler, and a pencil
- Template (included)
Directions
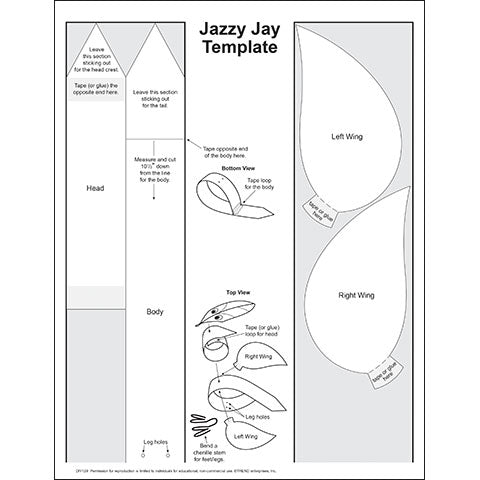
- Using the template provided in the download tab to the right, trace the head, body, and wings onto the back of your border strip. Cut out the pieces.
- Roll the strip for the body into a loop and glue or tape the end where indicated on template. Note you'll leave the pointed end of the body strip out (for the tail).
- Roll the head and tape or glue as noted on the template, leaving the pointed end sticking out for crest of the bird’s head.
- Set the body on a table with the tail resting on the surface. Use this resting position to gauge where the feet and head will attach.
- To make the legs, use a pencil to poke two holes in the bottom of the body. Thread a chenille stem up through one leg hole and down through the other. Adjust to even the stem out between the two sides. Tape the chenille stem down on the inside of the body to hold the placement.
- To make individual bird toes, bend each leg into 4 equal segments and shape so there are two toes on each side, as pictured.
- Tape or glue the head to the top of the body.
- Time to fly! Glue or tape the left and right wings to the top of the body.
- Lay the feather on top of the head. Position so the pointed end of the shaft faces forward (like the beak), and the other end sticks up along the pointed border piece. Glue the feather in place.
- Glue googly eyes on top of the feather.
Use your DIY paper bird to decorate for spring at home, school, and in care facilities. This craft inspires discovery about birds, migration, and more. Go for a nature walk to find other feathered friends, and then use this template or Color Harmony™ Spring Bird DIY to create them!
©TREND enterprises, Inc. 129
Download
Download template here!